
Construction drawings with Blender
Creation of my digitized laser engraving machine
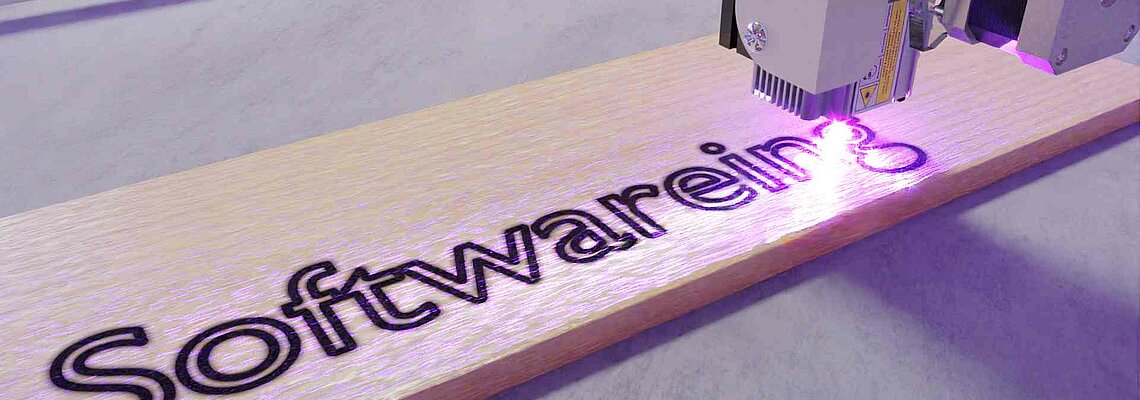
It is probably due to my love of detail and the desire to prepare everything as optimally as possible that I made a simulation of my laser, although the drawing was originally used to adapt new components for 3D printing. I've always loved painting, but there's a lot more you can do with Blender.
With the help of tutorials on Youtube and through my own experiments, I found out everything I needed to have my laser cut something out in the simulation.
In the file available at https://www.turbosquid.com/de/Search/Artists/softwareing?referral=softwareing you can find everything below.
The finished animation can be found on my blog.
Into keywords
- Hologram sticker, the illustrious play of colors can be set with or without the splinter look in the material
- Rotating toothed belt wheels, using geometry nodes instead of a transform modifier because it seemed simpler
- Springs that adjust their size when you unscrew the laser mount
- Drag chains that also change their height on the overhang
- Laser unit whose fan rotates when it works and whose cable folds more when its height is changed
- Laser driver that displays the current power of the laser, of course via geometry nodes
- Camera work, on a curve using offsets and target tracking
- Covers and housings that have been produced using 3D printers and effectively disappear and return in the animation
- Acrylic with fingerprints from material knots, as well as procedural scratches in the metal of the stepper motor housing
- Rustic wood materials, also procedural
- Particle systems, for laser cutting sparks, with fading sparks
- Laser beams from two diodes, one of which is deflected by a mirror or geometry node
- And of course a beautiful cord tape wallpaper, like we know it from our grandparents
Blender excited
Although I looked at all areas, only many functions remained unused, for example I didn't use individual scenes and combined them at the end. That might have saved computing time, but to what extent it could have been used sensibly – in my case – I was not sure until now.
In the Animation tab, I adjusted the movement of the camera so it pans correctly from one object to another. How exactly is lasered was unfortunately unchangeable in it. In fact, I settled for a simple solution. Instead of somehow assembling the geometry nodes in such a way that the time for the descent is adjusted according to the length of the section to be processed, I simply switched back and forth between one second of driving and two seconds of lasering. Curves of different lengths are then driven at a falsified speed. This is unrealistic, but it can be corrected more easily in the video post-processing, so there are sometimes more, sometimes fewer sparks per curve, but I find that acceptable.
There's definitely a lot more potential in Blender Studio and I'm happy about that, because I'll be using it frequently and eliciting more secrets from it.

Comments
No Comments